# DEMO示例
# 服务场景描述
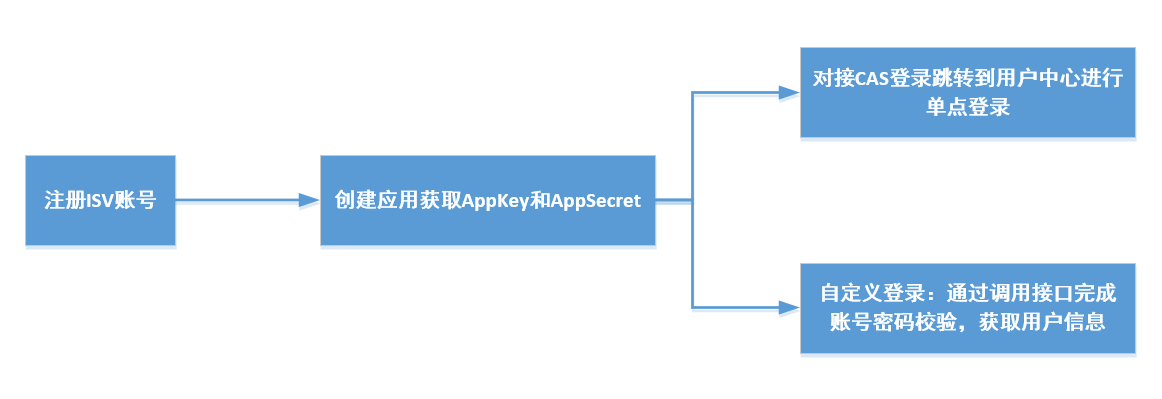
接入用户中心登录认证,通常有两种对接场景:
1、不需要自定义登录页面,直接跳转用户中心进行单点登录,登录成功后跳回应用,完成认证
2、自定义登录页面,仅调用用户中心接口完成账号密码校验,不需要完成单点登录
(如果不与用户中心完成单点登录,当跳转到其他广联达应用系统时,无法完成用户自动登录)

# CAS单点登录
# 方式一:通过接口接入
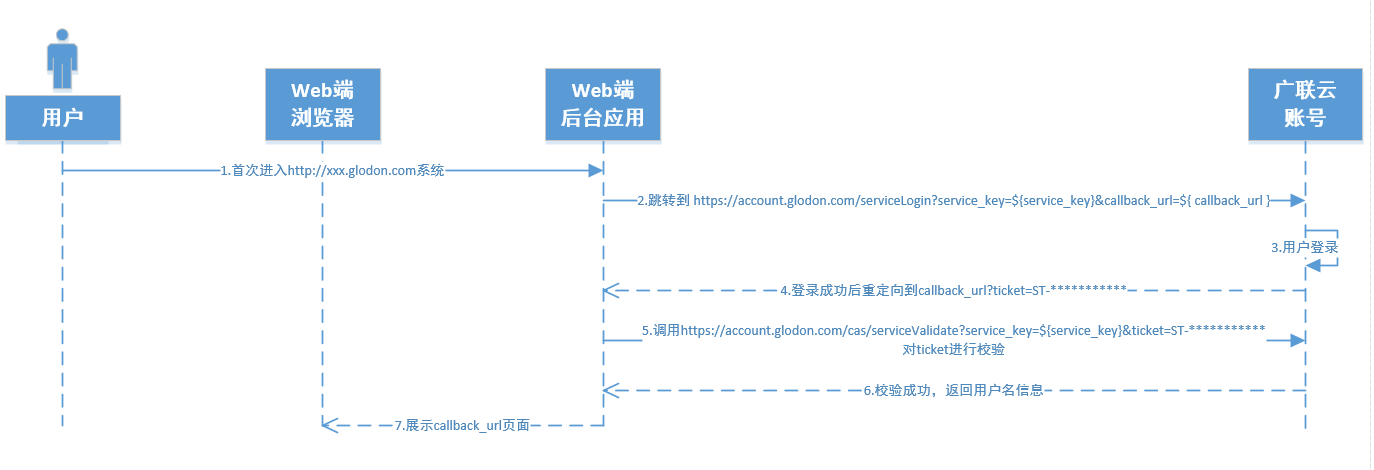
通过调用接口或集成CAS框架,当用户访问应用系统中任意受登录保护的页面时,检测到用户未登录,跳转到用户中心进行登录,认证成功后,跳转回原访问页面,并且在访问其他广联达应用时也无需再次登录(所有接入单点登录的应用),流程如下:

1)第2步 检测用户未登录时,将连接重定向到 https://account.glodon.com/serviceLogin?service_key=${service_key}&callback_url=${ callback_url }
其中callbackUrl 为验证通过后将要跳转的链接(如https://xz.glodon.com)。
2)第4步 在用户中心登录系统登录成功后,页面会自动重定向到${callbackUrl}?ticket=ST-**************
其中 ticket 为用户中心返回的认证票据。
3)第5步 在进入页面之前后台拦截请求 调用接口
https://account.glodon.com/cas/serviceValidate?service_key=${service_key}&ticket=ST-***********
4)第6步 验证成功后,返回结果如下:
<cas:serviceResponse xmlns:cas='http://www.yale.edu/tp/cas'>
     <cas:authenticationSuccess>
         <cas:user>6349137718052692904</cas:user>
         <cas:attributes>
             <cas:detail>...........</cas:detail>
         </cas:attributes>
         </cas:authenticationSuccess>
</cas:serviceResponse>
2
3
4
5
6
7
8
其中<cas:user>标签下内容为登录的用户名。
# 方式二:通过CAS框架接入
CAS最早是耶鲁大学开发的开源单点登录框架。CAS client是部署在应用端的,对于Java的Web项目来说,只需要添加CAS client的maven依赖,增加一些配置文件即可。
1)使用springboot,添加一个CasFilterConfig,在CasFilterConfig中创建filter,配置需要登录拦截的路径、登录成功后回调的地址以及由用户中心颁发的appKey和appSecret,即可完成接入;
demo示例:cas-springboot 点击下载
2)使用springmvc,则在web.xml中创建filter并完成配置。
demo示例:cas-springmvc 点击下载
# 自定义登录(OAuth2)
# 1.调用流程:
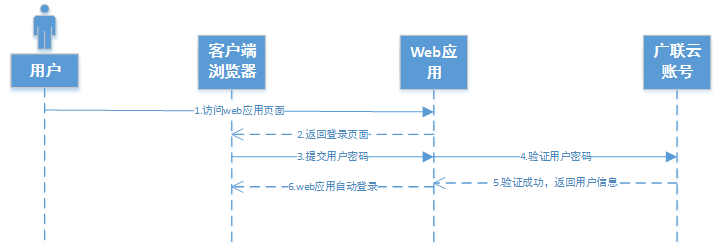
应用系统无需与用户中心实现单点登录,仅通过调用后台接口,完成用户密码校验,即可获取用户信息,自定义登录方式,流程如下:

# 2.本服务调用依赖以下API:
# 3.具体调用步骤
step1:获取用户AccessToken
1)将创建应用时获得的AppKey和AppSecret,进行Base64编码:
String appKeyInfo = String.format("%s:%s", appKey, appSecret); //appKey和appSecret之间有一个英文冒号,拼成字符串,appKey:appSecret
String credential = Base64.encode(appKeyInfo.getBytes("UTF-8")); //使用Base64加密字符串。注意:据RFC 822规定,每76个字符,还需要加上一个回车换行,此处需要去掉回车换行,结果不能包含回车换行等特殊字符。建议采用Apache的 commons-codec.jar
2
2)在Base64编码后的应用认证信息(credential)前加上"Basic "字符串(Basic后面有且只有一个空格),放入请求头Authorization中,调用获取AccessToken接口,完成用户名密码校验,获取用户的AccessToken:
shell示例:
curl --request POST 'https://account.glodon.com/v3/api/oauth2/token' \
--header 'Authorization: Basic QnVZY2************************JPbUE=' \
--header 'Content-Type: application/x-www-form-urlencoded' \
--data-urlencode 'grant_type=password' \
--data-urlencode 'username=138****8888' \
--data-urlencode 'password=**********'
2
3
4
5
6
java okhttp示例:
OkHttpClient client = new OkHttpClient().newBuilder()
    .build();
MediaType mediaType = MediaType.parse("application/x-www-form-urlencoded");
RequestBody body = RequestBody.create(mediaType, "grant_type=password&username=138****8888&password=**********");
Request request = new Request.Builder()
    .url("https://account.glodon.com/v3/api/oauth2/token")
    .method("POST", body)
    .addHeader("Authorization", "Basic QnVZY2************************JPbUE=")
    .addHeader("Content-Type", "application/x-www-form-urlencoded")
    .build();
Response response = client.newCall(request).execute();
2
3
4
5
6
7
8
9
10
11
3)返回结果:
{
    "code": 0,
    "message": "操作成功",
    "data": {
        "access_token": "cn-c4e7bae******************018058",
        "token_type": "bearer",
        "refresh_token": "cn-ebb0b3******************a21656",
        "expires_in": 604799,
        "scope": "account_info_write account_info_write account_token_login colibri_email"
    }
}
2
3
4
5
6
7
8
9
10
11
step2:获取用户信息
1)在step1中获取的AccessToken前加上"Bearer "字符串(注意不是Basic,Bearer后面同样有一个空格),放入请求头Authorization中,调用获取用户信息接口
shell示例:
curl --request GET 'https://account.glodon.com/v3/api/userinfo' \
--header 'Authorization: Bearer cn-c4e7bae******************018058' \
2
java okhttp示例:
OkHttpClient client = new OkHttpClient().newBuilder()
    .build();
Request request = new Request.Builder()
    .url("https://account.glodon.com/v3/api/userinfo")
    .method("GET", null)
    .addHeader("Authorization", "Bearer cn-c4e7bae******************018058")
    .build();
Response response = client.newCall(request).execute();
2
3
4
5
6
7
8
2)返回结果:
{
    "code": 0,
    "message": "操作成功",
    "data": {
        "id": 642***************4453,
        "fullname": "summer",
        "username": "summer",
        "email": "summer@glodon.com",
        "mobile": "138****8888",
        "globalId": "642***************4453",
        "gender": "m",
        "birthday": "2017-07-19",
        "qq": "33333333",
        "company": "工作单位",
        "avatarPath": [
            "https://account.glodon.com/avatar/show/642***************4453/32",
            "https://account.glodon.com/avatar/show/642***************4453/48",
            "https://account.glodon.com/avatar/show/642***************4453/120",
            "https://account.glodon.com/avatar/show/642***************4453/200"
        ],
        "avatarETag": "d3ae3deb197cc8a41a1542beb1423225",
        "displayName": "summer",
        "strId": "642***************4453",
        "nickname": "summer",
        "accountName": "138****8888",
        "createTime": "2019-01-04 14:10:44",
        "passwordStrength": 1,
        "passwordMobile": "138****8888",
        "verified": true,
        "enterpriseUser": false,
        "emailVerified": true,
        "mobileVerified": true,
        "defaultAvatar": false
    }
}
2
3
4
5
6
7
8
9
10
11
12
13
14
15
16
17
18
19
20
21
22
23
24
25
26
27
28
29
30
31
32
33
34
35
← 前置准备 获取AccessToken →